How to use MailChimp on your WordPress site

If you’re a musician on tour, an author with a new book release, or a non-profit with a fundraising campaign, mailing lists allow you to create digital newsletters that you can send out to customers, clients or fans. Newsletters and other mailing lists can be a great way to build regular traffic to your website, create brand loyalty, and earn money.

The service MailChimp offers a popular and inexpensive way to build full-featured newsletters. MailChimp provides a lot of design options and keeps track of how well your email campaigns are doing.

In this post I will explain several different options for integrating a MailChimp signup form on your WordPress website to immediately capture email information from your site visitors. Below you will find tips will work for sites hosted on WordPress.com as well as sites hosted on other providers.

How to add a MailChimp signup form on a self-hosted WordPress site

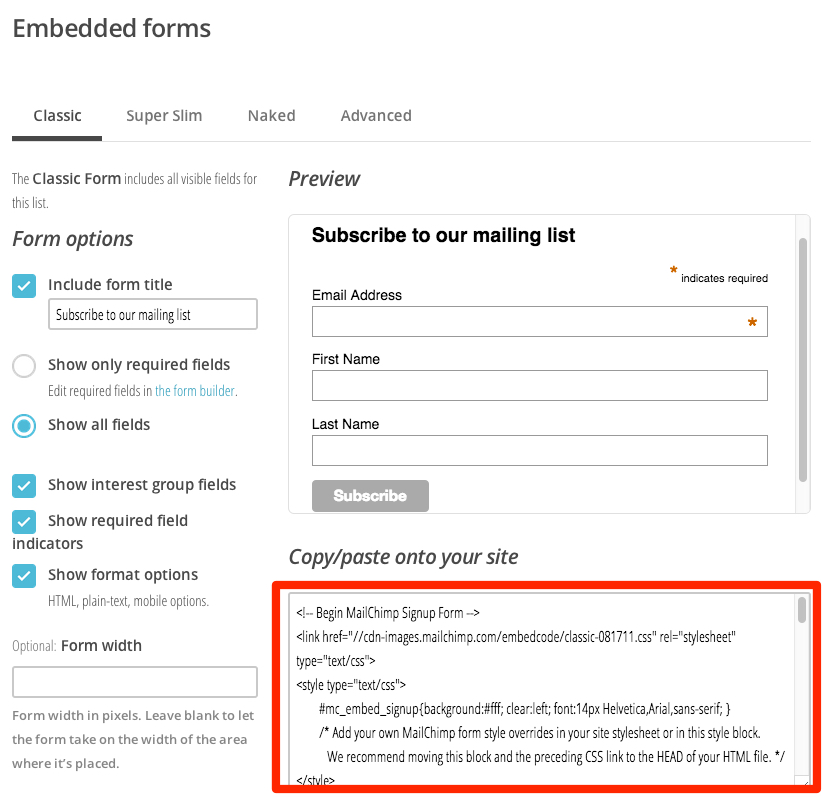
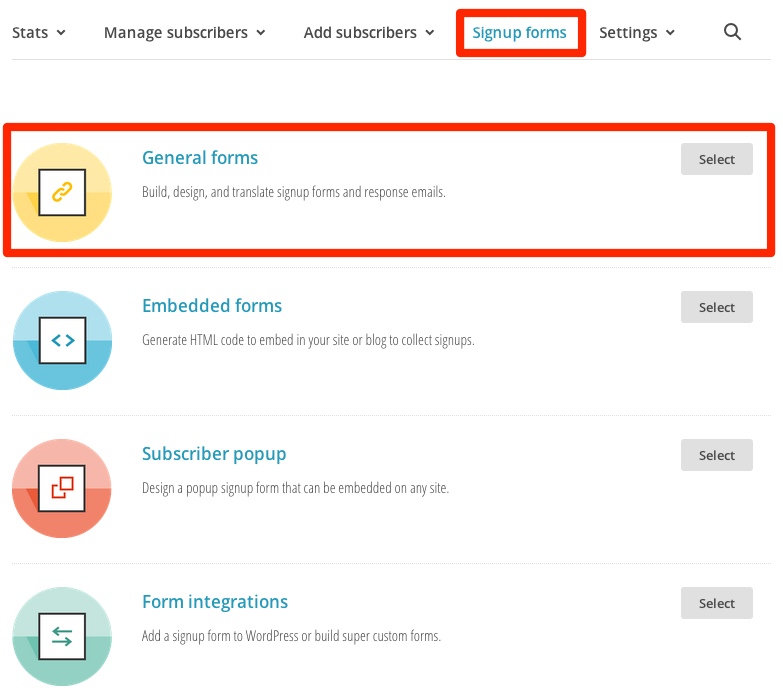
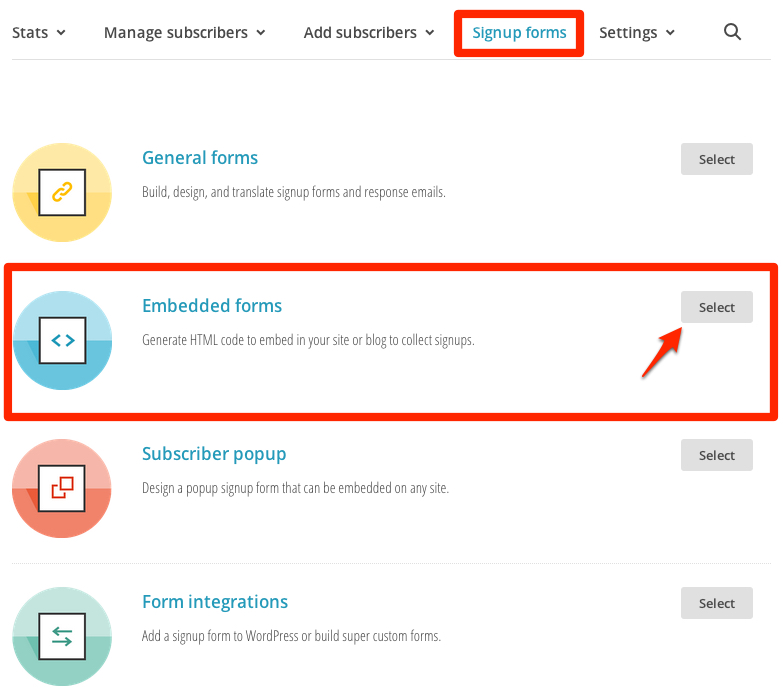
Generally speaking, to add MailChimp to a WordPress site, you can do it one of two ways. The first way to do it is to create your form in MailChimp and then use the code provided by MailChimp. You can find that under the list name. Navigate to Signup Forms and then to Embedded Forms, as shown below:

signup form

From there, you can create a form that includes the fields you want, and then capture the embed code:

embedded form


You can paste that code into a Text Widget or in the Text view on a post or a page.

Using a MailChimp Plugin

Alternately, you can install a MailChimp plugin and create your signup box there. On this site, at least at the time of writing I’m using MailChimp for WordPress. This plugin requires you to create an API code on MailChimp that you need to enter into the plugin settings page. That will allow your mailing lists to show up within the plugin so you can create your subscription box and then enter a shortcode (a brief code enclosed in brackets [ ] ) into a Text Widget.

MailChimp on WordPress.com sites

When your site is hosted on WordPress.com rather than a separate hosting provider, you cannot upload plugins, and you cannot use any embed codes, making both of the previous processes impossible. However, there is a pretty easy workaround.

First, create your MailChimp list just like you would any other list. From there, go to your list and then to Signup Forms, but choose General Forms this time:

genforms

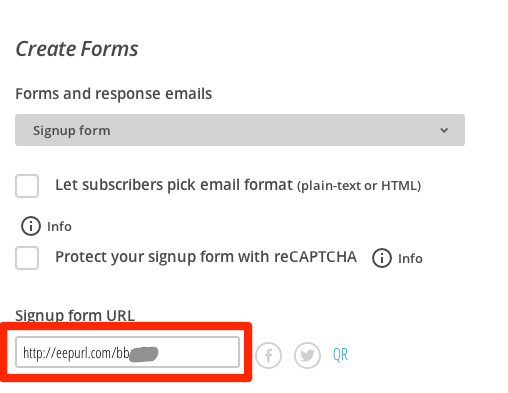
Create your form as you wish it to appear. You will need the Signup form URL:
createform

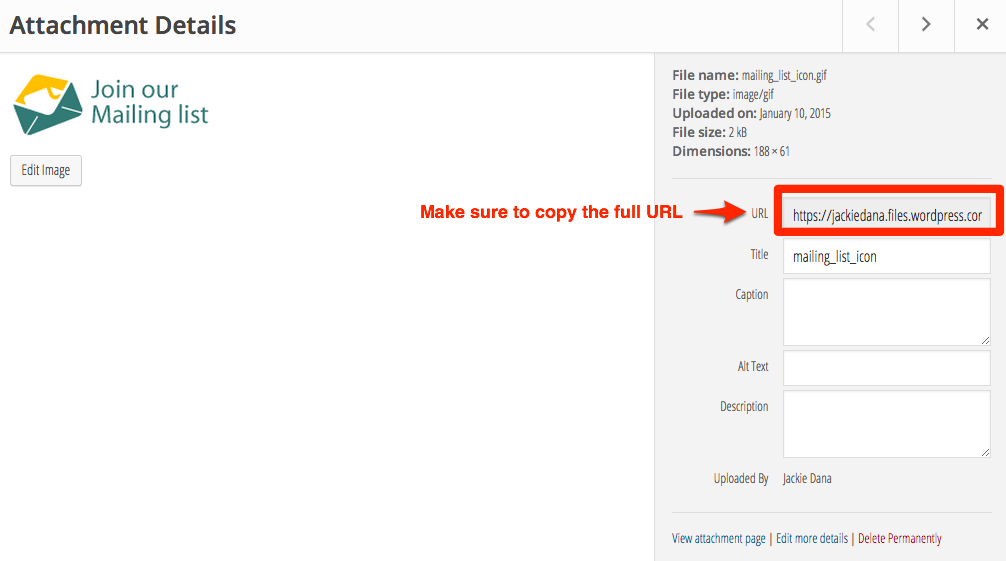
Find a good mailing list icon (I tried a Google Image Search for “mailing list icon” and found a number of them) or make your own. Go to your WordPress.com site and upload it to your site’s Media Library like any other image. Click on the image in your Media Library to open the Attachment Details page, and copy the URL from there:

medialibraryURL

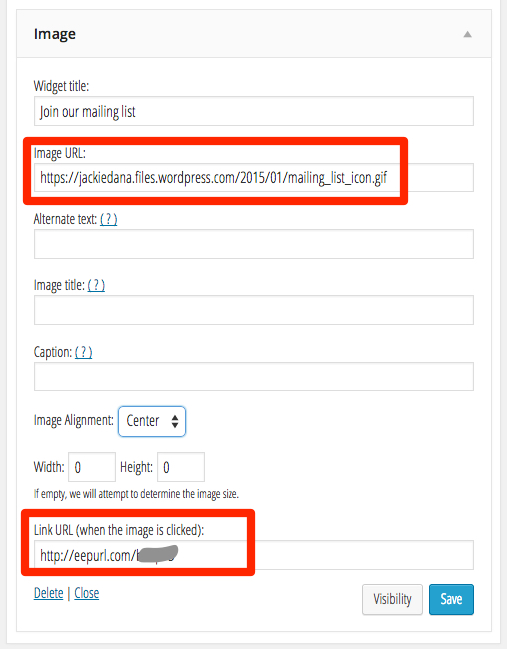
On your WordPress.com site, go to Appearance > Widgets and create a new Image widget. Paste the URL from the media library, above, into the form for “Image URL”. Then copy the URL from MailChimp (the eepurl.com address, above) and paste it into “Link URL”. It should look something like this:

imagewidget

Once you’ve saved it, you will have a clickable button that will take users to a signup form for your MailChimp newsletter!

 

What is Effective Content?

On the internet, content is everything.

Some SEO consultants will spin tales of woe, telling you that no one will ever visit your website unless you shell out big bucks. No matter what someone says, none of us have the keys to the secret kingdom of Google rankings.

Instead, you should focus on your content and that will improve site traffic, SEO and your conversion/sales rates.

In this post I’ll explain six things you can do to improve your site traffic.

1. Make sure your messaging is clear and concise.

When someone goes to your home page, do they know exactly what you are trying to do? Is it obvious that you are selling a product, providing a service, sharing your thoughts, or offering information? Too many people muddy their site with multiple messages or try to do too much.

For example, if you’re a freelancer, make sure your website screams to a new visitor what your services are. Alternately, if your primary goal is selling an Ebook, make sure there’s a ‘buy now’ button on your home page.

2. Identify your audience.

Who is the primary audience for your product, service or message? Figuring out who you’re trying to reach will help you decide on an appropriate website design, the kind of messaging you need to use, and effective keyword strategies to employ within your web copy and taxonomies.

3. Invest in effective copy.

You get a lot of bang for your buck with clear and concise writing on your website. This can seal the deal with potential customers/subscribers, who can quickly assess that your site provides what they need.

Are you using as few words as possible to explain your point? Too often people get bogged down in verbiage and no one wants to read a wall of text. If you’re not a writer, hiring a copywriter or an editor (such as myself!) would be a good investment.

4. Make your site as user-friendly as possible.

The prettiest website in the world is a complete failure if people can’t find and use the information they’re looking for. Make sure your menus and other navigation are easy to use, with clear labeling and logical structures and taxonomies. Try to anticipate everything a potential site visitor would want to do, and include a search box for those times when people want to do the unexpected.

An added tip: spend the extra time/money to make your site accessible to the visually or physically impaired. This will not only allow a larger segment of the population (including the elderly) to use your site, but it will also give you bonus SEO points.

5. Don’t forget images.

As I noted in my post, ‘How Images Can Boost SEO’, it’s important to use not only include effective images but also to tag them appropriately to help boost your SEO.

6. Update your content regularly.

Google hates sites that never change. If you don’t already have one, consider adding a blog, events calendar, announcements, or other regularly-updated content to your site, along with a commitment to keep this information fresh and timely.


Just past the halfway mark…

It’s November 17th, and the month is a little more than half over.

For a writer that can only mean one thing… NaNoWriMo (National Novel Writing Month), also known as the month in which writers nearly go insane, is also half over. We have willingly accepted the challenge to craft a new novel of at least 50,000 words, and it’s all downhill from here.

This is my second year participating in NaNo, and this time it should be a lot easier, right?

No, it doesn’t get easier. Sure, you learn some techniques and tricks during your virgin NaNo experience that make the mechanics easier the second time around. The writing, though… the stringing together of words in some sort of (semi) logical fashion, and constantly moving forward with a story? That never really gets easier. There may be times when you can spit out 3000 words without breaking a sweat… and times when putting together a complete sentence almost is beyond your grasp.

Some people treat NaNo as a game, and put word count above all else. There are those who wrote 50,000 words on the first day. Bully for them, bravo, whatever. In my opinion, they miss the whole point. NaNo isn’t a competition, it’s about giving you permission to be creative, and to make a commitment to yourself to write every day, no matter how good (or not so good!) it is. It’s about keeping the writing going even when you want to throw your computer out the window, when you want to scream, when everything you write sounds worse than the screenplay for Battlefield Earth.

Earlier another writer and blogger, Ingrid Sundberg, posted a bunch of inspirational images for NaNo writers. One of them struck me as particularly effective:

I like this because it reminds me that writing is hard work, even for people who like to write, and even for people who have turned out as many books and stories as Stephen King. (It’s no wonder so many famous novelists ended up becoming alcoholics and substance abusers. My guess is that intoxication was their only recourse to silencing the demons of doubt that haunt every writer.)

So I keep plodding along, even when inspiration doesn’t hit me, even when I’m sick with a cold. I’m staying above ‘par’ every day, with over 30,000 words in the ‘bank,’ so to speak, as I write this post. What’s a little bit terrifying is that while there’s just a mere 20,000 to go to ‘win’ NaNoWriMo, this novel will need easily three times that before I’ve reached the end of the story.

If you’re participating in NaNoWriMo this year, please leave a comment and let me know how it’s going. Are you pantsing or planning? Are you writing every day, and keeping on track, or are you falling behind?

How Images Can Boost SEO

When writing blog posts, it’s easy to make images and illustrations an afterthought. You might add one or two photos to jazz up the post or because the theme requires a featured image to display on the home page.

Did you know that carefully selecting images and tagging them properly can improve your search engine results and boost your ranking? By adding additional text to your images in the form of titles, tags and descriptions, you will provide additional data to Google and other search engines when they index your post. In turn, this will add rich content to your post or page, as well as allow the image itself to appear in search engine results for the content you’ve included.

To boost your SEO, you will want to pay attention to your image details whenever you upload a new image to your WordPress site. Things to watch are the following:

  • Your image title and permalink
  • Your image caption text (if any)
  • Your image alt tag
  • Your image description

How to add data to an image

Let’s examine the following information in the Media Library for the following image:

image-tagging

Image Title and Permalink

This is the first field that appears in your media library. Here you will want to use a title that is descriptive of the image at hand. Don’t upload images with IMG15913.jpg or whatever your camera/phone gives as a generic title. Instead, rename the files before you upload them to a useful phrase, or retitle them here. Note that the title is carried over into the permalink, which is the location for the image’s attachment page. The attachment page is the stand-alone page that displays the image on your site. The image title is important for search engines to use to identify the general content of the image.

Image Caption

Captions are optional, and the caption text will be displayed within a box or border surrounding your image, or in a separate type face (depending on your theme). If you decide to use captions, they can be a great way to convey additional information about your image, including the content, identifying people, and/or citing the source of the image. All of this information can then be used by search engines to understand what information is included in the image.

Image Alt Tag

Alt tags are very important and should be included on all images. This information is what will be displayed if your image is not viewable on your site, such as when someone with a visual impairment goes to the page with a screen reader. However, alt tags also provide critical information to Google, which is also blind and cannot ‘see’ your image.

When creating an alt tag, be descriptive but concise. Explain briefly what the image is, within the context of the site. Do not write sentences or ‘keyword stuff’ your alt tags.

Image Description

The description is what will display on the stand-alone attachment page (the permalink noted above). You can write anything you want here, so you can get creative and include an entire paragraph or more of information if you wish. The key here is remembering that again this is providing data to search engines.


By including some or all of this information with each of your images, you will increase your post or page SEO and increase the likelihood that someone will find your site in a Google Image Search as well.

Setting up Google Analytics for WordPress

The following steps will explain how to create a new account with Google Analytics and connect it to your WordPress site so that you can begin collecting analytic data on who is visiting your site, which pages they view, and other data points.

1) Go to Google Analytics and log in with your Google/Gmail account.

2) Click on “Access Google Analytics” in the top right corner:

access GA

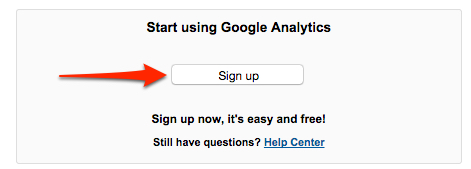
3) Sign up for Google Analytics by clicking on the button on the following page:

start using GA

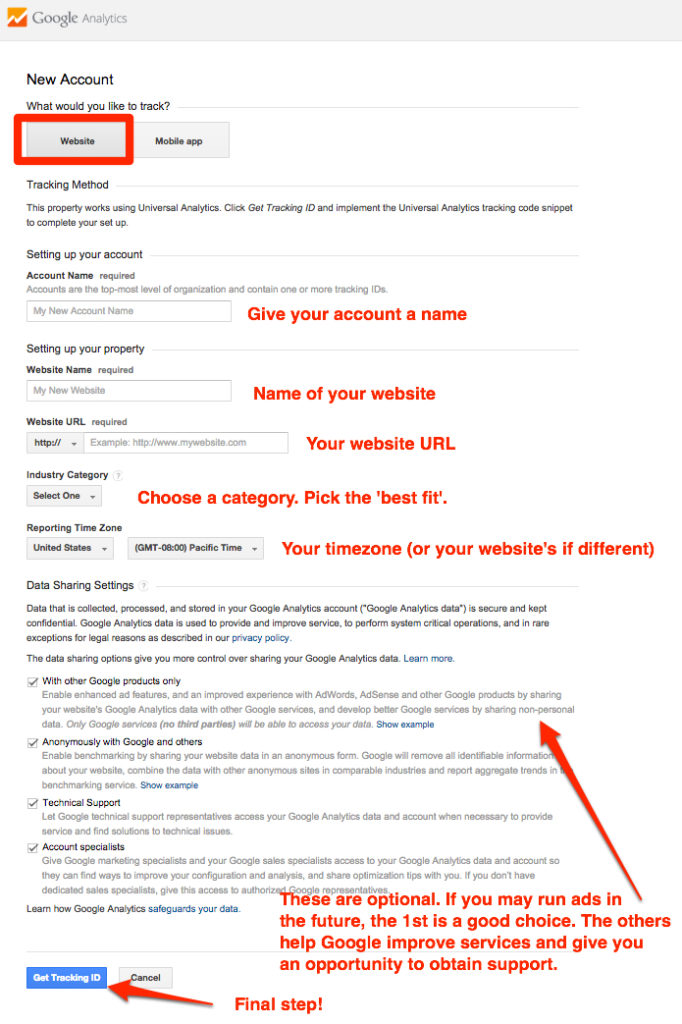
4) Fill out the New Account information as indicated below:

Note that this account can be used for a number of websites (each having its own “property”), so you should choose your business name or your own name, rather than the website name.

GA new account

After agreeing to the Google Terms of Service, you will land on your new account’s Admin page. You will be able to get back to this page any time you need to by going to https://www.google.com/analytics/web/ while being logged into your Gmail/Google account.

5) Copy the Tracking ID (a code beginning with UA-). For most WordPress sites, you can disregard the tracking code snippet below the ID.

For example:

trackingID

6) Install and activate a Google Analytics plugin.

Two plugins that I recommend (you only need one):

7) Enter your Tracking ID into the plugin (or connect with Google through the plugin) according to the plugin instructions.

Once you have connected your site to Google Analytics, Google will start collecting data behind the scenes. When you’re ready to check out the data, you can view some basic data in the plugin (depending on which one you choose) or log into Google Analytics for a full view. Caveat: depending on the traffic to your site (and the age of your site) it may be weeks or months before you have meaningful data to analyze.

NaNoWriMo 2014 – Let the Adventure Commence!

Participant-2014-Web-Banner


Last year a colleague suggested I try NaNoWriMo, the National Novel Writing Month challenge. I decided to take the plunge, having no idea where it would take me or if I could even meet the terms of the challenge: To write a novel from scratch in 30 days. To write 50,000 words. And maybe hardest of all, to write approximately 1700 words every single day of the month.

What was I thinking? I’ve written a couple of novels… and that took almost twenty years!

All the same, I gave it a shot, thinking that I’d be able to get a little writing done, and test out a new story idea.

I had no idea how much it would change me.

I wrote about my experience just after NaNo 2013 concluded, but now it’s been a whole year. In the past eleven months, I’ve become a much more serious writer, and now I do my best to write or edit every day for at least a couple of hours. Sometimes I’m still writing at dawn. I’ve spent countless, wonderful hours over the past year rewriting, editing and shaping the novel I “completed” in November, which as it turned out was barely a fraction of what my novel would become. Along the way, I’ve invented new characters, created a new antagonist while turning my bad guy into a hero of sorts, and explored all kinds of twists and turns, highways and byways.

It’s been both rewarding and frustrating, because let’s face it: editing is hard work.

Writing a 50,000 word novel is difficult, but turning that into a quality piece of fiction is a whole different beast.

What I didn’t expect about NaNo was how it would change me as a person. In addition to taking my writing more seriously, I’ve begun to interact with other writers, and have made new friends. I’ve researched publishing options. I’ve written more blog posts. I read different books, and more of them. And now, every Facebook post or TV show or conversation with friends over beer could turn into something amazing.

As the month of October races on, I’ve redoubled my efforts to finish the draft of my first novel so that I can start with a clean(ish) slate come November 1st. There are a lifetime of possible stories in the new world I’ve created, and so this year’s novel will be a sequel of last year’s. This comes with the benefit of having some ready-made characters and backstory, and hopefully will help me refine and expand upon some ideas that I can later port back into novel #1.

While I’m very excited to be able to once again create something new, I’m a little apprehensive about what I’ll have to do once December arrives. I’m still not completely done with my last novel; will I end up with editing debt? It’s a bit intimidating. Nonetheless, I shall press on and see what happens. I’m hoping that having a better idea of the concept of this story, and a possible ending, will keep me from getting way off track, so that my editing process will be a bit cleaner. I also anticipate being a bit more organized and clever in how I approach the task in general, having done it successfully once and learned a lot of lessons along the way.

With that in mind, these are my recommendations to myself and to anyone else who wants to give NaNo a shot this year:

  • Have a clear idea of the novel’s concept, even if you have no idea of the plot.
  • Start getting to know your main character(s) before you start. Give them names, occupations, a couple personality quirks.
  • Have at least a vague idea for how the novel should end. Maybe even write the ending first. That way you know where you’re going. (I wish I had done this last year!)
  • Don’t plan too much out in advance… allow each day to be an adventure.
  • Write fast and furiously for the first week while the ideas are fresh and your energy’s plentiful, and get way ahead of your wordcount. That might save you later in the month.
  • Make a solemn promise to yourself to not edit as you go (it’s hard to do it, but very liberating!).
  • Deny the existence of writer’s block. If you get stuck, just start typing anything. Seriously. Even if it’s just “I don’t know what I want to write about tonight. I’m tired and I don’t know where to take my character now…” What happens when you do that is some of the most powerful magic I’ve ever experienced.
  • Meet fellow NaNo writers in person, on the NaNo forums, on the NaNo facebook group, or wherever you can find them. Lean on them for encouragement, inspiration, accountability, and friendship. 🙂

For a writer, participating in NaNoWriMo is one of the greatest adventures we can ever have. I can’t wait until November 1st!